Boat trailers operate in some of the harshest conditions any piece of equipment faces: saltwater immersion, road vibration, UV exposure, and long stretches of sitting completely unused. That combination accelerates wear in ways that aren’t always visible until something fails. A little consistent maintenance goes a long way toward keeping your trailer road-ready, so you can get on the water quickly and reliably.
Below, we’ll walk through the core maintenance tasks every boat trailer owner should be doing, pulled directly from the Venture Boat Trailer Owner’s Manual.
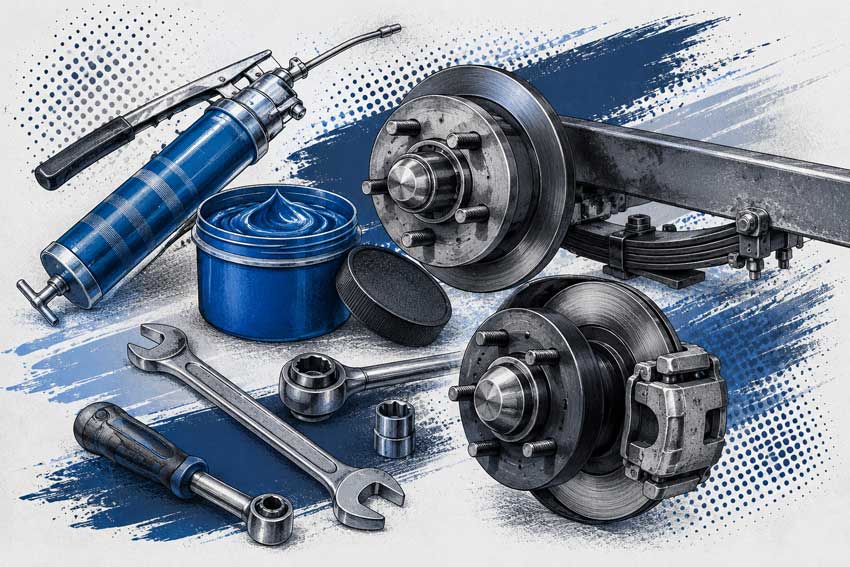
Bearings and Hubs: The Most Important Habit You Can Build
Hub and bearing failure is one of the most common and most preventable causes of roadside breakdowns. The culprit is usually neglect: dry bearings overheat, and overheated bearings fail.
Grease every 3 months or 1,000 miles, whichever comes first. Use a Lithium Complex NLGI #2 grease. Venture recommends Castrol Pyroplex Red, Lucas Red ‘N’ Tacky, or Lucas Marine Grease (blue). Apply through the grease zerk fitting located behind the rubber grommet at the center of the hub.”
There’s an important exception to know: if you’ve been towing for several hours and then back the trailer directly into the water, the hot metal hubs contract when they hit the cold water, which can draw moisture inside. Grease the hubs immediately after submersion in that situation. The fresh grease forces any water out through the front of the hub.
Once a year, regardless of mileage, the hubs need to come apart entirely for a full inspection. Pull the hub, remove the bearings, clean and inspect the spindle surfaces, and look for any discoloration, pitting, rust, or scoring on the bearings and races. Always replace the inner hub seal and cotter pin at reassembly, even if they look fine. Seals are a few dollars; hub damage is not.
Brakes: A System That Quietly Deteriorates
Trailer brake systems receive less use and attention than almost any other braking system on the road, and boat trailers add water immersion on top of that. The result is a system that can degrade between seasons without obvious symptoms.
Inspect the calipers, rotors, and brake pads at least once a year. Check that calipers engage and release cleanly, that caliper bolts and bleeder valves are tight, and that there are no signs of fluid leaks or piston binding.
For rotors, look for scoring, heat discoloration, rust pitting, and uneven wear between the two sides of an axle. Surface rust after the trailer has been sitting is normal and typically scrubs off after the first few stops. But if you’re storing the trailer for the winter, a light coat of cold galvanizing spray paint on the rotor faces helps prevent heavier buildup. Never spray WD-40 on rotors. It soaks into brake pads and kills braking performance.
Check brake pad thickness annually or any time you notice reduced braking, unusual sounds, or increased drag. Pads should be replaced when the friction material reaches 3/32″ (2.4mm) or less. In saltwater environments, also watch for rust bonding between the pads and rotors after the trailer has been sitting. If the wheels don’t spin freely before a trip, don’t assume they’ll free up on the road.
Brake fluid is hygroscopic, meaning it absorbs moisture over time. In marine environments, fluid can absorb enough water in two years to meaningfully lower its boiling point, increasing the risk of brake fade or failure on a long downhill or emergency stop. Purge and bleed the entire system after the first year of use, then every one to two years depending on use frequency and environment. Use only fresh DOT 3 or DOT 4 fluid, and never reuse fluid that’s been opened or drained.
One easy habit that dramatically extends brake life: take the trailer out once a month, even during the off-season, and make three or four complete stops at normal road speed. This cleans rust off the rotors, exercises the caliper pistons, and prevents the pads from bonding to the rotors during storage. Rinse the calipers and rotors with fresh water after, then drive briefly with a few more brake applications to dry everything down before parking.
Tires: Easy to Neglect, Costly to Ignore
Underinflation is the leading cause of trailer tire failure. Unlike car tires, trailer tires should be inflated to the maximum cold pressure listed on the sidewall, not a lower “comfort” pressure. Check pressure at least monthly and always before a trip.
Because boat trailers often sit for extended periods, tires are particularly susceptible to UV damage and dry rot. Inspect the sidewalls closely before each towing season. Cracking, even if minor-looking, is a warning sign. If you store the trailer outdoors, tire covers that allow airflow (don’t fully enclose the trailer in a tarp) help protect against sun damage.
Pay attention to how your tires are wearing:
- Wear on both outer edges usually means underinflation.
- Center wear points to overinflation.
- Wear on one edge only suggests a misalignment or bent axle.
- Cupping or scalloping indicates bearing, balance, or suspension issues.
Rotate tires annually and keep a simple log of pressure readings and wear patterns by position. This makes it much easier to catch developing problems before they become roadside emergencies.
Always carry a properly inflated spare mounted on a wheel that matches your trailer’s lug pattern and load rating. Check the spare’s pressure monthly along with the main tires.
Lug Nuts and Hardware: The Simple Checks That Get Skipped
Lug nuts and structural fasteners loosen under road vibration and thermal cycling. The consequences of neglect can be severe.
After any new wheel installation, re-torque the lug nuts at 10 miles, 25 miles, and 50 miles, then periodically during normal use. Torque specs vary by wheel size and material (steel vs. aluminum), so use a calibrated torque wrench and follow the specifications for your specific setup.
All major structural fasteners— the ½” hardware securing frame rails, crossmembers, bunks, and suspension components — should be checked for proper torque at least once every 12 months. One exception: the leaf spring eye bolts on leaf spring trailers are designed to allow movement and should only be snug, not fully torqued. Over-tightening these causes the suspension to bind.
Frame and Structure: The Slow Corrosion Problem
Both galvanized steel and aluminum frames resist corrosion well, but neither is maintenance-free, especially in saltwater environments.
After every launch, rinse the entire trailer frame with fresh water. For galvanized steel, scrub periodically with mild soap and a soft bristle brush to remove salt and road grime. Touch up any visible surface rust annually: sand lightly with emery cloth and apply at least two coats of cold galvanizing paint.
Aluminum frameswon’t rust, but they do oxidize. You’ll notice a white, chalky buildup that’s harder to remove the longer it sits. If you see oxidation forming, use natural cleaners like a vinegar and cream of tartar mix or a commercial aluminum cleaner. Never use ammonia or trisodium phosphate on aluminum. After cleaning, a coat of aluminum-safe metal polish and automotive wax slows future oxidation.
A few easy-to-miss spots worth checking regularly:
- Under bunks and brackets, where wood and carpet trap moisture against the frame
- Hollow frame sections, which can hold standing water if drain holes get blocked
- Areas where dissimilar metals contact each other — stainless hardware in aluminum frames creates galvanic corrosion over time; nylon or plastic isolator pads help prevent this
Lights and Wiring: The $5 Fix That Prevents a Fine
Trailer lighting failures are common and disproportionately easy to prevent. Saltwater immersion corrodes plug connections quickly, and vibration eventually works on even well-installed wiring.
Once a year, unplug each light from the harness and inspect the plugs for corrosion. Lightly sand any oxidation with emery cloth and dip all plugs in dielectric grease before reconnecting. Dielectric grease is inexpensive and one of the best anti-corrosion investments you can make. Also inspect the wiring harness for fraying, bare wire, or pinched areas where wires pass through frame holes.
LED lights, the light units themselves aren’t serviceable, so if one fails, replace the unit. The wiring harness and ground connections still need to be checked regardless. LED units handle saltwater immersion better than incandescent lights, but they’re only as reliable as the wiring connecting them.
Coupler, Actuator, and Winch
The coupler and actuatorform the critical link between your truck and trailer, and on surge brake systems they also control hydraulic braking. Lubricate the ball latch mechanism every three months with WD-40. Before every tow and before storage, apply a light coat of bearing grease to the tow ball and inside the coupler socket. Inspect the emergency brake cable before every trip. Fraying, cracking, or rust means replace it immediately, no exceptions.
After every saltwater launch, rinse the coupler and actuator with fresh water. Salt corrosion inside an actuator is insidious and expensive.
The winchdeserves attention every six months: check for smooth operation and apply marine-grade grease to all gears on the pinion and reel shafts. Inspect the winch strap before every trip for fraying, cuts, or worn stitching. Replace at the first sign of damage. A winch strap costs less than the damage a failed one causes.
One important reminder: the winch is for pulling the boat onto the trailer, not securing it during transport. Always use transom tie-downs for the road.
Suspension: Leaf Springs and Torsion Axles
Leaf spring suspensionsbenefit from a visual inspection every six months. Check hangers, shackles, and equalizer hardware for cracks or excessive rust. Touch up surface rust on hangers with cold galvanizing paint; replace cracked hangers immediately. Every 12 months, check axle alignment. A difference of more than ¼” between measurements on opposite sides means the suspension needs to be realigned.
One maintenance tip for leaf springs that most owners skip:annually coat the entire spring assembly with recycled bearing grease, working it between the leaves. Water and debris accumulate between the leaves and accelerate rust from the inside out. Grease creates a barrier that meaningfully extends spring life.
Torsion axle suspensionsare essentially maintenance-free. There are no serviceable internal components. What requires attention is visual inspection: if the torsion arms appear bent, sagging, or uneven, the axle needs to be replaced. If the trailer gradually starts to sit unevenly or low over time, that’s a sign the torsion arms are losing elasticity and the axle is nearing the end of its service life.
Bunk Boards: The Hull Protector
Bunks get wet, dry out, and sit under a boat all season. They don’t need much, but they do need periodic attention.
Before retrieving your boat, always check the bunk surface for trapped sand or gravel. Grit between the bunk carpet and the hull is the leading cause of hull scratches. Inspect the carpet annually for tears or areas where the wood is exposed, and replace with marine-grade carpet only. Standard indoor/outdoor carpet holds water and accelerates wood rot.
Inspect the lumber annually as well. Venture uses kiln-dried Southern Yellow Pine, which resists twisting better than pressure-treated lumber. If boards are cracked or rotted, replace them. Minor warping sometimes self-corrects when the boards get wet and reloaded; severe warping should be replaced.
A Practical Maintenance Schedule
The manual’s maintenance requirements are easy to summarize into a few recurring intervals:
Before every trip:
- Check tire pressure
- Inspect the winch strap
- Verify coupler is properly locked
- Confirm all lights work
- Inspect the emergency breakaway cable
Monthly:
- Grease hubs (or every 1,000 miles)
- Exercise the brakes with 3–4 full stops
- Check tire pressure including the spare
Every 6 months:
- Visually inspect suspension components, frame, and winch
Annually:
- Full hub disassembly and bearing service
- Inspect and replace brake pads as needed
- Inspect calipers, rotors, and brake lines
- Flush and bleed brake fluid (every 12–24 months)
- Rotate tires
- Check and torque all structural fasteners
- Inspect and clean wiring harness and plugs
- Coat leaf springs with grease
- Touch up rust on galvanized components
Consistent maintenance isn’t glamorous, but it’s the difference between a trailer that does its job for decades and one that fails at the worst possible moment. Most of what’s described above takes only a few hours per year and costs very little in materials.
We’re here to provide all the resources you need to maintain your boat trailer for years to come — from routine upkeep to part-specific troubleshooting. You’ll find it all in our Trailer Maintenance section, organized by component and system.